

Do you have a 403 Forbidden issue on your WordPress website? It’s one of the most horrible mistakes a WordPress newcomer may make. We’ll show you how to solve the 403 prohibited errors in WordPress in this article.
Contents
403 Forbidden – Access Denied WordPress Error:
When an error occurs on your website, WordPress displays codes and notifications.
When your server restrictions prevent access to a specific page, the 403 Forbidden error code is displayed.
As a result, the error is frequently accompanied by the following text:
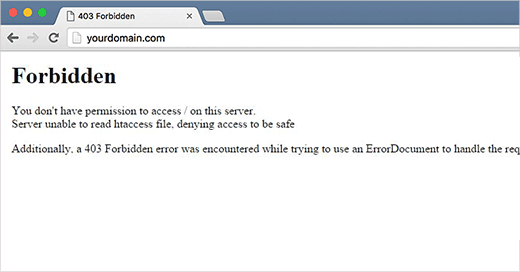
Forbidden – 403 On this server, you do not have permission to access '/'.

Additionally, when using an ErrorDocument to handle the request, a 403 Forbidden error was received.
This error can be seen in a variety of situations. Consider the following scenario:
- Access to the wp-admin or WordPress login pages is denied with a 403 Forbidden error.
- During the WordPress installation, a 403 Forbidden error occurs.
- When browsing any page on your WordPress site, you’ll get a 403 Forbidden error.
- It’s also possible that you’ll merely get ‘Access Denied’ rather than the full 403 Forbidden message.
- ‘Access to yourdomain.com was denied’ may also appear. This page is not accessible to you because you do not have permission to read it.’
Now that you’ve learned about the many forms of 403 errors, let’s look at what produces them.
What Causes a WordPress 403 Forbidden Error?
Poorly setup security plugins are the most prevalent source of the 403 Forbidden error in WordPress. If an IP address (or a range of IP addresses) is suspected of being malicious, many WordPress security plugins can block it.
This is why we utilize Sucuri to make all of our WordPress sites more secure.
A corrupt .htaccess file or incorrect file permissions on your server could also be to blame.
Your WordPress hosting provider may make inadvertent modifications to their server settings from time to time. Your site may receive a 403 Forbidden error as a result of this.
With everything out of the way, let’s look at how to fix a 403 prohibited error in WordPress.
Fixing the 403 Forbidden Error in WordPress
Before you do anything, make a complete backup of your website in WordPress. Here’s how to make a manual backup of your WordPress site.
If you’re already using a WordPress backup plugin, check sure you have access to the most recent backup before proceeding.
1.Resolving a WordPress Plugin-Induced 403 Forbidden Error
The first step is to deactivate all WordPress plugins for the time being. This includes any security plugins you might have on your site.
If this solves your problem, it’s likely that one of your website’s plugins was the source of the mistake.
You can figure out which plugin caused the error by turning on all of your plugins one by one until you can duplicate the 403 prohibited error.
2.Resolve the 403 Forbidden Error Due to a Corrupt.htaccess File
A corrupt .htaccess file on your WordPress site is frequently the source of the 403 error. It’s simple to fix this file.
To begin, use an FTP client or cPanel’s file manager to connect to your website.
Then, in the root folder of your WordPress site, look for the .htaccess file. If you can’t find the .htaccess file in your WordPress folder, follow this guide.
You must save the .htaccess file to your computer in order to have a new backup. Following that, you must remove the file from your server.
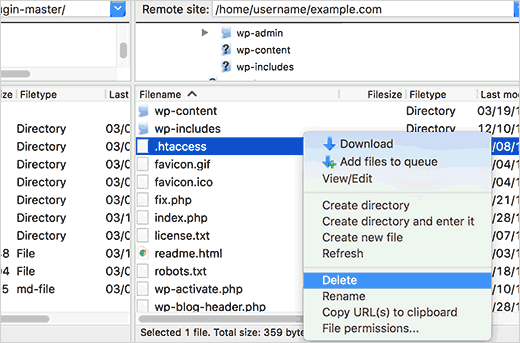
Make an attempt to reach your website. If the 403 prohibited error is resolved, it is likely that your .htaccess file was corrupted in some way.
It is possible to create a new .htaccess file by entering it into your WordPress admin area and visiting the Settings » Permalinks page.
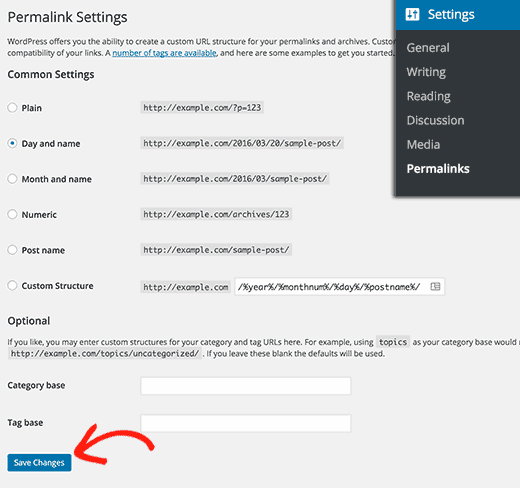
Then, at the bottom of the page, simply click on the Save Changes button, and WordPress will automatically produce a new .htaccess file.
Resolve the 403 Forbidden error in WordPress that is caused by file permissions.
All of the files on your website are protected by file permissions. The file permissions on your website regulate who has access to the files and folders on your website.
The 403 prohibited error might be caused by incorrect file permissions. It tricked your web server into believing that you did not have permission to access those particular files.
It is possible that wrong file permissions are the most likely cause of the 403 prohibited error on your website if neither of the two fixes listed above work.
You can request that your WordPress hosting provider examine your website to ensure that the file permissions are proper. Some hosts are quite accommodating; they would not mind and would most likely take care of the situation for you.
Changing the permissions of a file on your own can have disastrous repercussions. If you are not confident in your ability to do the task, contact a friend for assistance or hire a professional.
If, on the other hand, you choose to do it yourself, this is how you would go about checking your file permissions.
Connecting to your WordPress site with an FTP client is all it takes. Navigate to the root folder of your WordPress installation, which contains all of your WordPress files.
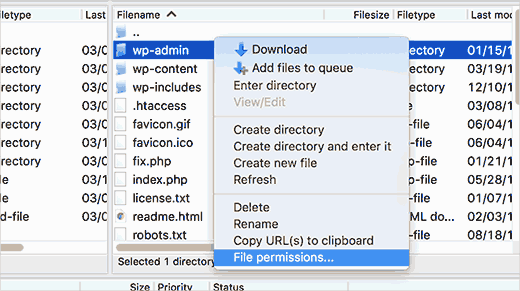
Select a folder by clicking on it, then right-clicking and selecting File Permissions from the pop-up menu.
Your FTP client will display a file permissions dialogue box that looks somewhat like this:
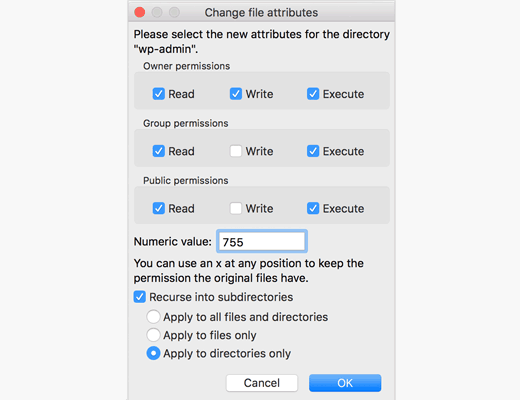
It is recommended that all of the folders on your WordPress site have a file permission of 744 or 755.
It is recommended that all of the files on your WordPress site be protected with the file permissions 644 or 640.
You can adjust the file permissions for the root folder to 744 or 755, depending on your needs. Then, check the box next to ‘Recurse into subdirectories’, followed by the option that reads ‘apply to directories only’ to make the change permanent.
To proceed, click on the OK button. After that, your FTP client will begin setting permissions for all subdirectories included within that folder.
Once this is completed, you must repeat the procedure for each of the files. The file permissions for this time will be 644 or 640 and don’t forget to check the boxes for “Recurse into subdirectories” and “Apply to files only” this time. options.
When you click on the OK button, your FTP client will begin setting file permissions for all of the files that you have selected.
You should be able to browse your website now without seeing the 403 forbidden error.
We hope that this information has been of use in resolving the 403 prohibited error in WordPress. You may also be interested in our expert tips and techniques for securing your WordPress administration area.