
When uploading files in WordPress, do you get the ‘Upload: Failed to write file to disc’ error? For inexperienced users, this typical error can be extremely annoying. We’ll teach you how to fix the “Upload: failed to write file to disc” error in WordPress in this article.
What Causes WordPress Failed To Write File To Disk Error?
This error can arise for a variety of reasons. The most prevalent one, though, is wrong folder permissions.
Permissions are assigned to each file and folder on your website. Based on these permissions, your web server controls file access.
Incorrect folder permissions can prevent you from writing files on the server. This means that your web server will be unable to generate or add new files to that folder.
If you try to upload photographs or other files from the WordPress admin area, one of the following error messages will appear:
WordPress was unable to write to disc.
WordPress was unable to upload due to an error in writing the file to disc.
The directory wp-content/upload could not be created.
How to Resolve the Upload Failed to Write to Disk Error in WordPress
To begin, use an FTP program to connect to your WordPress site.
We’ll be utilizing the free FileZilla FTP client for this lesson. If you’re using a different FTP client, it can look a little different.
Once connected, right-click on the wp-content folder and select file permissions.

This will open your FTP client’s file permissions dialogue box. It displays file permissions for the owner, group, and public.
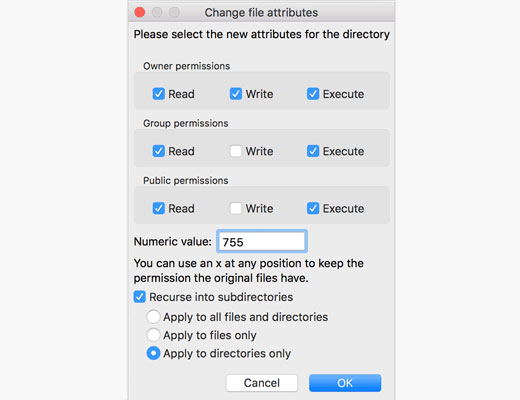
In the numeric value field, you must input 755.
After that, make sure the box next to ‘Recurse into subdirectories’ is checked.
Finally, select the ‘Apply to directories only’ option.
To proceed, click the OK button.
Your FTP client will now set folder permissions to 755 for all sub-folders in the wp-content directory. This includes the uploads folder, which contains all of your photographs.
You should also double-check the file permissions for specific files in your wp-content folder.
Right-click the wp-content folder once more and choose file permissions. This time, we’ll adjust file permissions.
Check the box next to ‘Recurse into subdirectories’ and enter 644 as the numeric value.
Finally, select ‘Apply to files only’ from the drop-down menu.
To proceed, click the OK button. For all files in the wp-content folder, your FTP client will now adjust file permissions to 644.
You can now try uploading files to your WordPress site.
If the error persists, contact your WordPress hosting provider and request that the temporary files directory be deleted.
WordPress saves your photos in a temporary directory on your web server before uploading them to WordPress. The files are then saved in your WordPress uploads area.
WordPress will be unable to write the file to disc if this temporary directory is full or incorrectly configured.
This temporary folder is on your server, and you won’t be able to access it via FTP most of the time. Contact your site host and request that they empty it for you.
We hope that this post was helpful in resolving the error ‘Upload: Failed to Write File to Disk’ in Windows 10.
This temporary folder is on your server, and you won’t be able to access it via FTP in most instances. You must contact your site host and request that they empty it for you.
We hope this post was helpful in resolving the WordPress ‘Upload: Failed to Write File to Disk’ Error.