
When trying to update a WordPress plugin or theme, do you get the message ‘Fatal error: Maximum execution time of 30 seconds exceeded’?
This problem usually occurs when a PHP code in WordPress takes a long time to run and exceeds the WordPress hosting server’s maximum time limit. The time limit is vital because it prevents server resources from being abused.
We’ll teach you how to fix the fatal error: maximum execution time exceeded in WordPress in this article.
What Causes the Maximum Execution Time Exceeded Error?
WordPress is primarily written in PHP, a scripting language. A time limit for how long a PHP script can execute has been implemented to safeguard web servers from misuse.
The precise time limit varies per hosting company, but most of the time it’s set between 30 and 60 seconds because that’s usually enough time for a solid PHP script to run.
Maximum execution time exceeded error occurs when a script hits its maximum execution time limit.
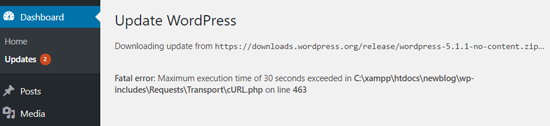
Error: Maximum Execution Time Has Been Exceeded
Despite the fact that the Maximum Execution Time Exceeded problem is referred to as a “fatal error,” it is one of the most common WordPress mistakes, and it is simple to fix.
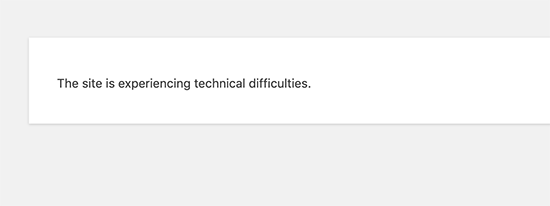
WordPress may display the following error message to your website visitors depending on when and where the mistake occurs.
This is part of the WordPress 5.2 fatal error prevention functionality. You may also receive an email stating which plugin (if one was responsible for the mistake) caused the problem.
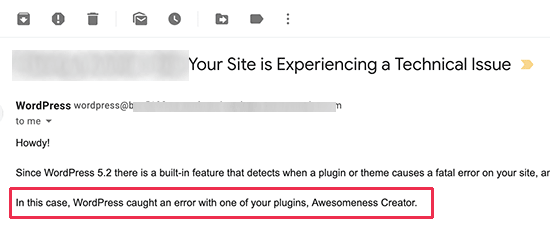
You’ll also receive an email with a special link that will allow you to log in to WordPress in ‘Recovery mode.’
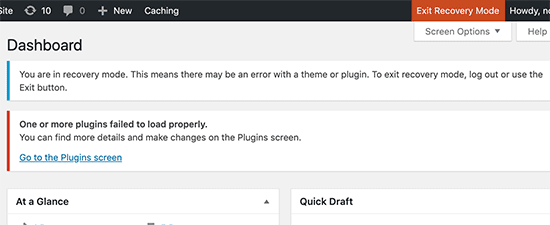
You can then simply deactivate or delete the plugin that is causing the issue.
If you don’t want to disable a plugin, you can address the underlying issue that caused the error.
You’ll need to manually modify your .htaccess file and add a single piece of code to remedy the problem.
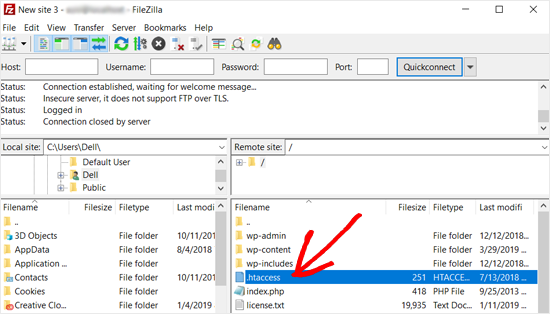
Using an FTP client, connect to your website.
The .htaccess file is in the same location as the /wp-content/ and /wp-admin/ folders. If you’re having trouble finding it, see our article on why you can’t find the .htaccess file and how to locate it.
If you use FileZilla as your FTP client, for example, it can be found in the ‘Remote Site’ area on the right-hand column.
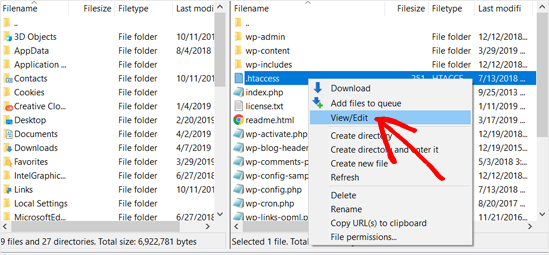
When you’ve found the .htaccess file, right-click it and select ‘View/Edit.’ This will launch a text editor and open the file.
Then, at the bottom of your .htaccess file, add the following line:
php_value max_execution_time 300
If you are using Notepad as your text editor, here is how it may look.
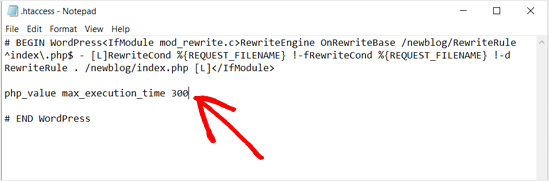
Once done, save your file.
Simply set the maximum execution time to 300 seconds with this code (5 minutes). You can now check to see if the error has been rectified on your website.
If the problem still occurs, try increasing the value to 600.
If you found this way to be more convenient, check out these WordPress .htaccess tips.
Modifying your php.ini file is another way to fix the maximum execution time exceeded error in WordPress.
The php.ini file is a server configuration file that defines PHP settings. It’s possible that you won’t see it in your WordPress folder on some WordPress hosting platforms.
In that scenario, you can create a new php.ini file in the root folder of your WordPress installation. After that, add the following line to the php.ini file.
max_execution_time = 60
Don’t forget to save and publish your modifications to the server after you’ve finished. You can now check your website to see if the problem has been resolved.
Increasing the maximum execution time with either of these two techniques will usually fix the problem. If it doesn’t, you’ll need to get in touch with your WordPress hosting provider for help.
We hope this post was helpful in resolving the fatal problem in WordPress: maximum execution time exceeded. You might also be interested in our tutorial on how to fix a database connection error in WordPress.