
Are you seeking a simple approach to locate and redirect 404 error pages on your WordPress website?
When users try to access a page on your website that no longer exists, they will receive a 404 error. These 404 errors degrade the user experience, which can result in decreased search engine results and eCommerce sales.
We’ll show you how to track 404 pages and reroute them in WordPress in this article.
Contents
What is the meaning of a 404 Error?
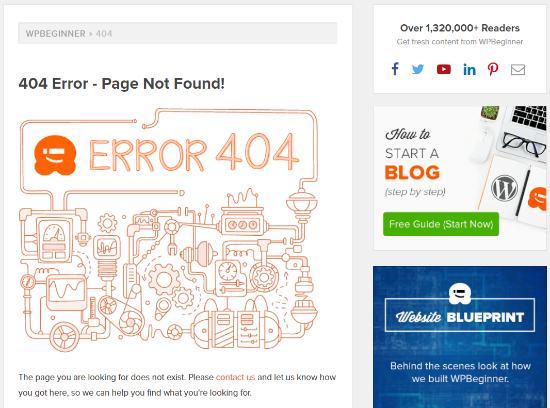
A 404 error is an HTTP status code that indicates that the server was unable to reach the web page you requested.
This implies that if you type in the URL of a non-existent web page, you’ll get a 404 page not found error.
There are a variety of reasons why a 404 error occurs. It could be because you typed the URL address incorrectly, the page was removed from the website, or the domain name no longer exists.
Another source of a 404 error is when a page was relocated to a new URL but not correctly redirected, resulting in a broken link.
Last but not least, 404 errors in a WordPress website might be caused by server issues.
Why Track and Redirect 404 Pages?
Now that you understand the many causes of 404 errors, let’s look at why it’s critical for website owners to track and rectify them.
The user experience on your site will suffer if you have 404 errors. Users will leave your site and go to your competitors if they can’t find the page they’re looking for.
This means you’ll lose out on potential consumers and miss out on the chance to convert visitors to subscribers.
Aside from that, 404 errors have a detrimental impact on the SEO rankings of your WordPress site. When websites encounter broken links, search engine ranking algorithms frequently penalize them.
Not to mention that these broken sites will result in your website losing valuable backlinks, resulting in a decreased domain authority and a considerable decline in Google keyword ranks.
With that in mind, let’s look at how you can quickly track 404 pages in WordPress and redirect them. We’ll go over two distinct approaches, so feel free to skip ahead to your favorite method by clicking the link below:
Method 1: Using AIOSEO, track 404 pages and redirect them in WordPress
The All in One SEO plugin for WordPress, often known as AIOSEO, is the simplest way to track and fix 404 pages on your WordPress website. It’s the most popular SEO WordPress plugin, with over 2 million users.
With AIOSEO’s robust redirection manager, you can quickly detect pages with broken links and restore them with only a few clicks.
The finest thing about AIOSEO is that it assists you in setting up speedier 301 redirects, which improves your search engine rankings.
We’ll be utilizing the AIOSEO Pro edition for this guide because it contains the strong redirection manager addon. AIOSEO has a free version, however, it lacks the 404 monitoring and redirection manager.
The AIOSEO Pro plugin must first be installed and activated. Please visit our step-by-step guide on how to install a WordPress plugin for additional information.
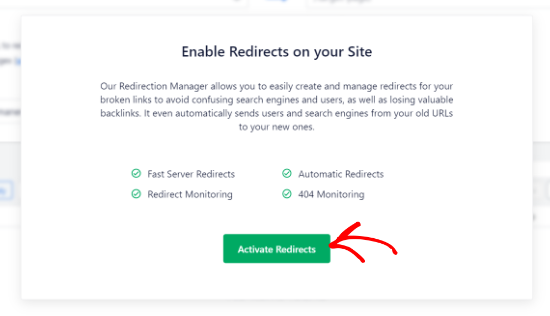
Go to All in One SEO » Redirects and click the ‘Activate Redirects’ button after the plugin is activated.
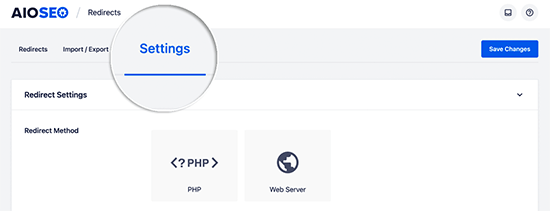
Then, under Redirects, go to the ‘Settings’ tab to activate 404 logs and track pages with broken links.
Simply go to the ‘Logs’ area and make sure the ‘404 Logs’ option is turned on. Then, using the drop-down option, choose the time period for which the 404 records will be kept. For optimal server performance, we recommend no more than one month.
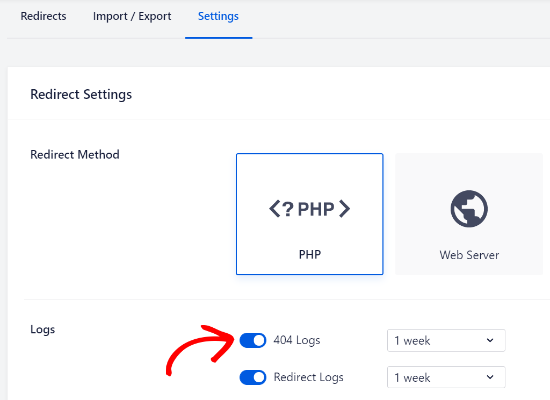
After you’ve finished, click the ‘Save Changes’ button.
In AIOSEO’s Redirects section, you’ll now find a 404 Logs tab.
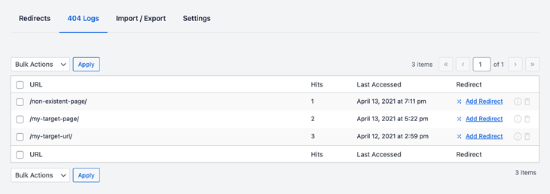
This page will contain no data when you initially enable 404 logs. After you enable the setting, it solely monitors 404 pages.
Once enabled, AIOSEO 404 logging actively monitors your website for 404 problems and displays them here.
It will provide a list of all URLs that contain a 404 error, as well as the number of times the link has been viewed in the ‘Hits’ column and the date it was last visited in the ‘Last Accessed’ column.
After you’ve discovered the pages with broken links, simply click the ‘Add Redirect’ button to redirect them.
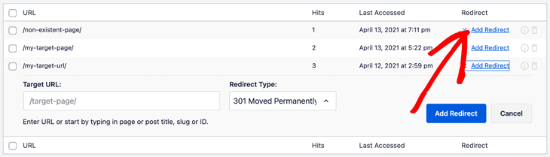
When you click the button, you’ll see a drop-down menu where you may enter a target URL and choose a redirection type. Selecting the 301 Moved Permanently option, for example, will transfer a page permanently.
After that, click the ‘Add Redirect’ button, and your broken link will now redirect to the new destination URL automatically.
Note: Over time, the size of your log file might balloon and consume a significant amount of storage space. Errors can occur due to a lack of WordPress hosting disc space.
It’s best practice to remove and clean 404 error logs to ensure you don’t run into this issue.
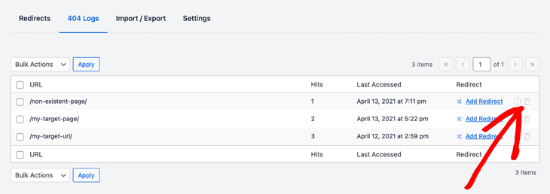
By clicking the trash can button in AIOSEO, you can effortlessly delete any particular 404 error from your logs.
By heading to All in One SEO » Tools and then clicking on the ‘Database Tools’ page, you can erase your 404 logs in masse.
Then, in the ‘Logs’ area, click the ‘Clear 404 Logs’ button.
Aside from 404 error tracking, AIOSEO redirect management also includes permalink monitoring. This means that if you remove a page from your site or modify the URL of a blog post, you will be prompted to set up a redirect.
AIOSEO can even put up the correct 301 redirects for you without any work in some circumstances.
Setting up speedier 301 redirects in WordPress using AIOSEO is a bonus tip.
By navigating to the Settings tab and selecting the Web Server redirect technique, AIOSEO allows you to build significantly faster redirection.
When compared to the default WordPress / PHP redirect approach, this allows you to achieve considerable speed gains.
Method 2: Using the Redirection Plugin, track 404 pages and redirect them in WordPress.
The Redirection Plugin for WordPress is the next option for keeping track of 404 sites and redirecting them.
Note that this is a sophisticated plugin, and it may be difficult to use for certain beginners.
The plugin must first be installed and activated. Please visit our step-by-step guide on how to install a WordPress plugin for additional information.
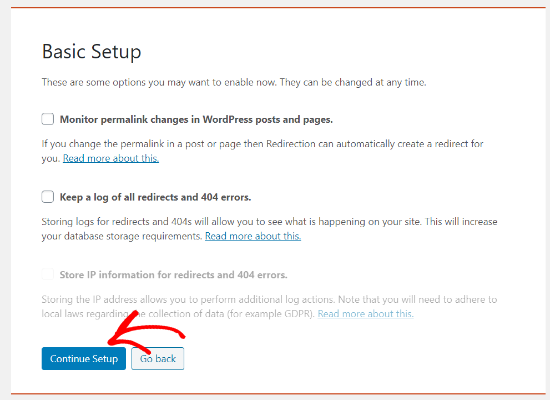
To set up your redirects, go to Tools » Redirection after activation and scroll down to the ‘Start Setup’ button.

Following that, the plugin will ask if you want to monitor permalink changes in WordPress and preserve records of redirection and 404 errors.
Simply check the boxes for these choices before clicking the ‘Continue Setup’ button.
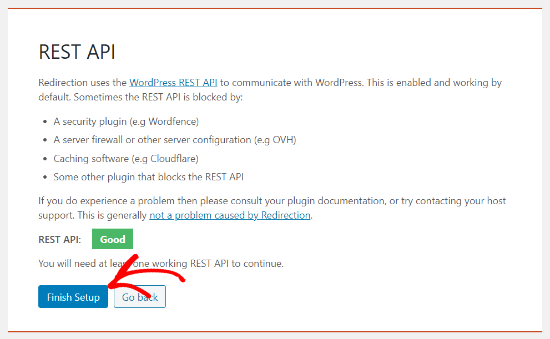
The plugin will now check the status of the Rest API. You can click the ‘Finish Setup’ button when the status result is Good.
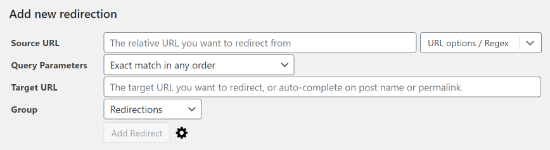
After that, you can create a new 404-page redirection. To begin, in the Source URL box, type the URL of the page you want to redirect.
From the Query Parameter drop-down option, choose whether you want to match the query parameter exactly, disregard it, or send it on to the destination URL.
Now, enter the Target URL to which the 404 page will be redirected, select ‘Redirection’ from the Group drop-down menu, and click the ‘Add Redirect’ button.
Click the ‘tool symbol’ next to the Add Redirect button if you want more options for setting up redirection.
Begin by entering the old URL in the Source URL field, selecting the Query Parameter as previously, and adding a Title to describe the redirect’s purpose.
After that, choose Match from the drop-down menu. There are other alternatives available, such as URL just, URL and referrer, URL and user agent, and URL and login status.
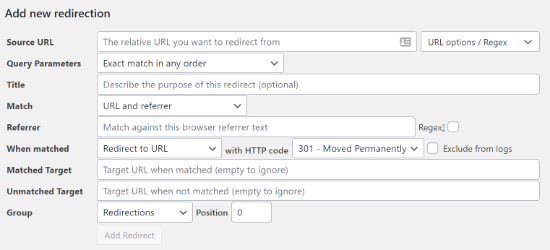
You should use URL and referrer in most circumstances. Specifically, if you observe multiple 404 requests for a single page, it’s unlikely that it’s due to a user typo, but rather to someone pointing to the incorrect URL.
It will now automatically redirect anyone who links to the broken URL or a post that you relocated to the new site.
Next, double-check that your action is set to ‘Redirect to URL.’ The other solutions are more complicated and necessitate a high level of technical understanding.
Select an option from the HTTP code drop-down (such as 301 – Moved Permanently) for the redirection type.
Finally, in the Matched Target column, type the target URL. After you’ve filled out this form, click the ‘Add Redirect’ button.
You can check that the redirection is operating properly by going to the new URL.
The plugin also allows you to keep track of 404 error logs. Simply select the ‘404s’ option at the top of the page, and the plugin will display recent 404 problems that have happened on your site since the plugin was installed.
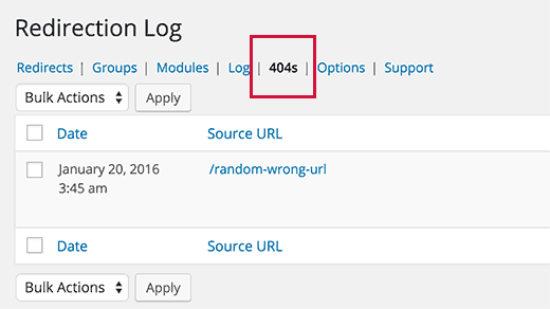
The 404 log page will be empty if you just enabled the Redirection plugin. After the plugin is activated, it begins keeping a log of 404 problems.
We hope this article taught you how to track 404 pages in WordPress and redirect them.